
Ai Content Generator
Ai Picture
Tell Your Story

How to Connect Rollo Printer to Wi-Fi? (Complete Tutorial)
A few months ago, I bought a Rollo X1040 printer to save time managing my online store, and it delivered on that promise. I needed to print labels quickly while packing parcels, updating inventory, and notifying customers. Everything was ready except the printer. But at first, I had to figure out “how to connect Rollo printer to Wi-Fi“ as soon as possible.
If you’re here to find the solution to a similar issue, don’t worry; you’re in the right place. Whether you’re connecting your Rollo printer to WiFi using the Rollo app or accessing the web portal, this guide will explain everything, covering every common issue and how to fix it.
Checklist: Prepare Your Rollo Printer for WiFi Connection
You must be aware of these helpful tips while connecting the printer to WiFi:
- Make sure your WiFi network is strong and reliable.
- Position your router near the printer for good connectivity and minimal interruptions.
- Have your WiFi password ready, and write it down for future use.
- Ensure Bluetooth is turned on if using a mobile device.
- Install the Rollo app on your smartphone.
- Ensure your WiFi network operates on 2.4 GHz, as 5 GHz is incompatible.
- Avoid using public or guest WiFi networks, as they may block printer communication.
- Update to the latest firmware through the Rollo app.
- If you are using a firewall or antivirus software, allow app permissions so that it doesn’t block the app or printer communication.
How to Connect Rollo Printer to WiFi: 2 Different Methods
There are two methods to connect your printer to WiFi. You can choose any of the following methods:
Method 1: Through the Rollo App
- Plug in and turn on the printer.
- Make sure both your phone and printer are connected to the same WiFi network.
- Download and open the Rollo app from the App Store (for iOS) or Google Play (for Android).
- Check for a solid white light on the printer, which shows readiness to pair.
- After that, tap “Add a new printer.”
- Select the Wireless printer and tap Connect via WiFi.
- Then, enter your WiFi name and password.
- Wait for the solid green light to turn solid (connected).
- Once connected, the app will offer a test print to ensure everything is working correctly.
- Your printer will now be connected to your WiFi network, if the print is successful. Now, you’re ready to use it.
Note: If the light turns red or blinks, restart the app and try again.
Method 2: Using the Web Portal
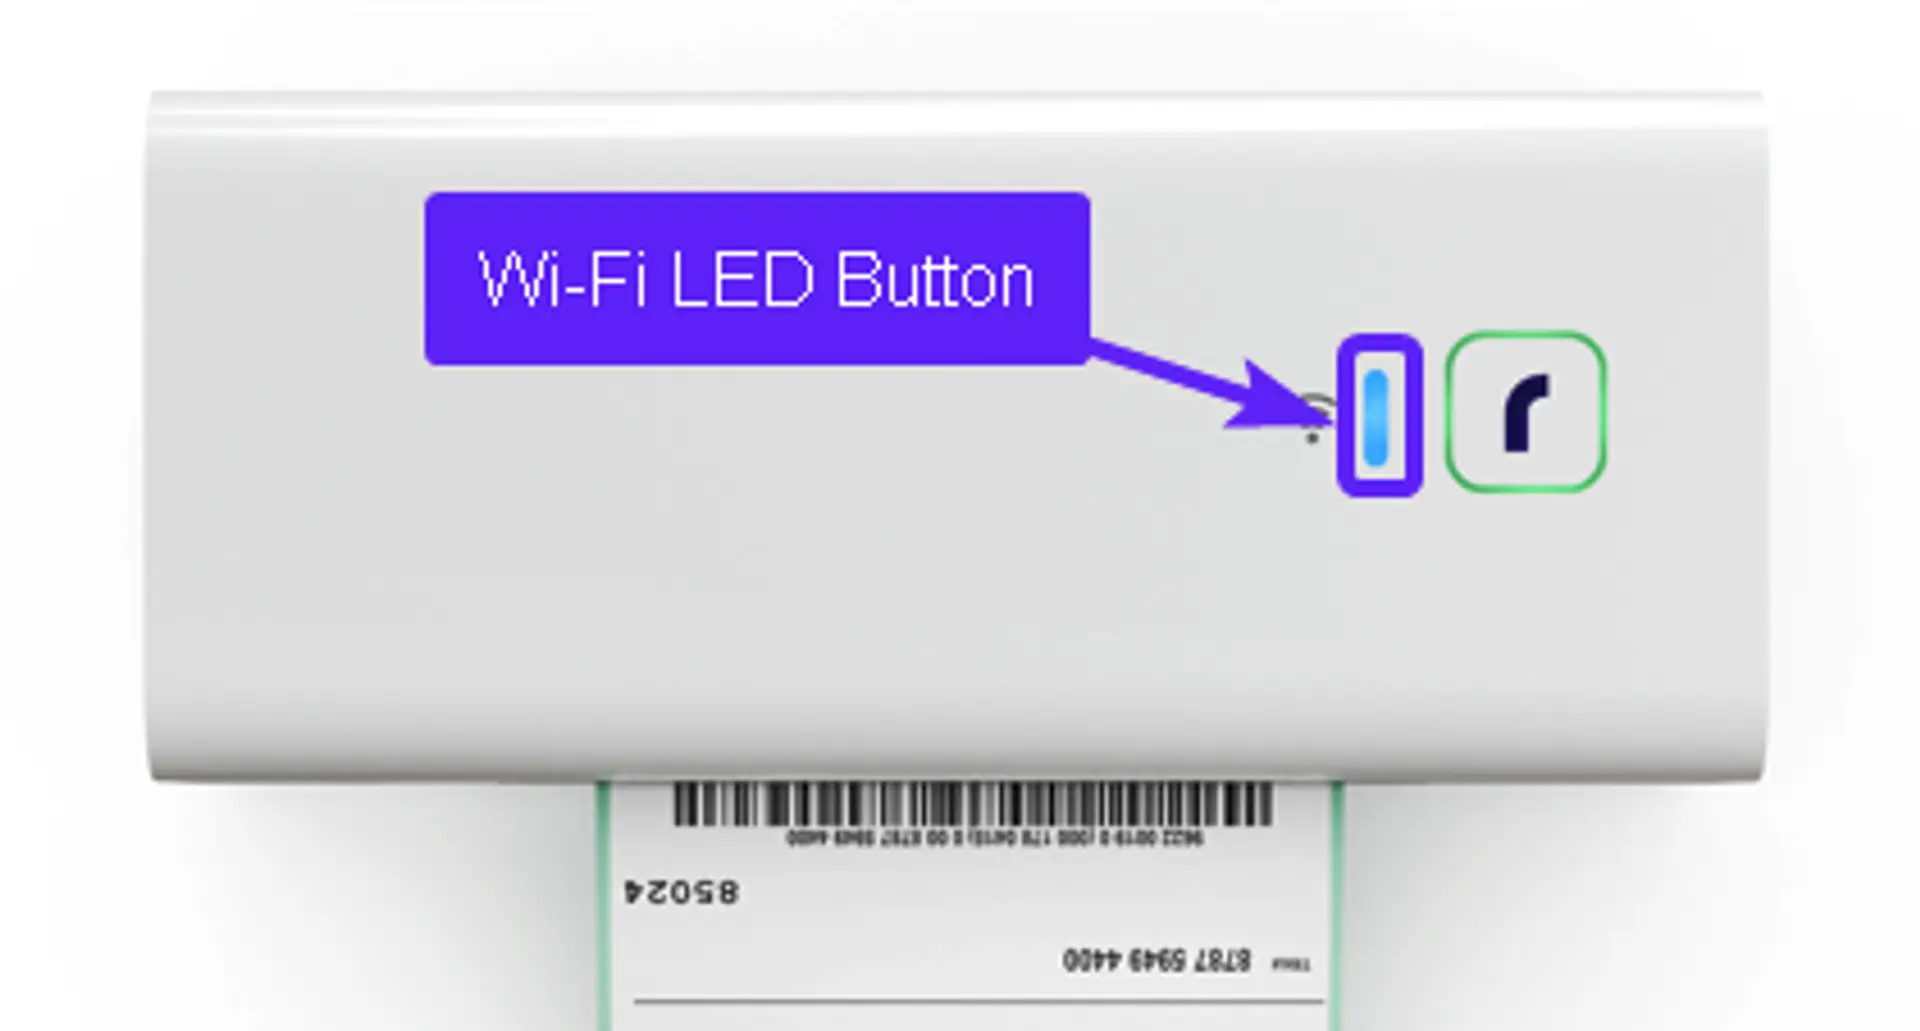
- First, press and hold the WiFi LED button on your printer for 11-15 seconds until the light flashes yellow.
- This yellow light will put your printer in Access Point (AP) mode.
- On your computer, go to WiFi network settings and select your Rollo network to connect.
- If asked, select “Connect using a Security Key instead” and enter “rollo printer” as the password.
- Once connected to WiFi, open a web browser and navigate to the printer’s web portal.
- In the web portal, choose your WiFi network from the list.
- Then, enter the password for your home WiFi network.
- When the light turns solid blue, the printer is connected.
- To verify the connection, print a Rollo sample.
Note: Connection will fail if the network is 5 Hz. Ensure you’re using 2.4GHz.
Troubleshooting Rollo Printer Wi-Fi Connection Issues
You may face these issues while connecting the printer to WiFi, so here is your troubleshooting guide.
Problem 1: Rollo Printer Light Is Flashing Red
Solution: A flashing red light on a Rollo printer generally indicates a label-related issue or a communication error, especially when trying to connect to WiFi. To troubleshoot, follow these steps:
- Press and hold the top circular button on the printer until you hear one beep sound.
- If you are using WPS (Wi-Fi Protected Setup), make sure your router supports it and is in WPS mode.
- The printer will automatically calibrate by adjusting label positioning to detect gaps and align settings.
- Ensure your printer is connected to a stable WiFi network.
- If the issue is with the Wi-Fi connection, you may need to factory reset the printer and re-establish the connection.
- Ensure the power adaptor is securely connected and that the printer is plugged into a functioning outlet.
Problem 2: Rollo Printer Is Not Showing Up in the App
Solution: It is likely due to a connection or driver issue. Try the steps given below to troubleshoot:
- If it’s a USB printer, make sure it’s plugged into a working USB port.
- If it’s wireless
- Check that your phone is connected to the same 2.4GHz WiFi you want the printer to use.
- Check if the correct printer driver is installed on your computer.
- Restart the Rollo app and try adding the printer again.
- If the printer still does not appear, disconnect it from power for 30 seconds before reconnecting.
Problem 3: Can’t Connect via Rollo Printer Portal
Solution: You may be on a 5 GHz WiFi network or have not joined the Rollo WiFi AP mode network.
- Check if the printer is online in your computer’s printer settings.
- Ensure you’re using 2.4 GHz WiFi, not 5 GHz.
- On your PC, go to the WiFi settings and connect to the printer network.
- Use the password “rollo printer” to connect.
- Try installing the latest printer drivers.
- Try uninstalling and reinstalling the current printer drivers.
Conclusion
Now that you’ve learned “how to connect Rollo printer to WiFi“, you’re ready to enjoy seamless, high-speed label printing. This guide provides the steps to ensure correct network connections, AP mode activation, and firmware readiness.
Whether you ship products daily or print occasionally at your office, a proper wireless setup keeps your Rollo printer running smoothly and reliably on your network.
Frequently Asked Questions (FAQs)
How to Reset Rollo printer to factory settings?
Learn “how to Reset a Rollo printer to factory settings“, press the Wi-Fi LED button rapidly 10 times to initiate the factory reset process. If you’re using a Rollo X1040, hold the Wi-Fi LED button for 26-30 seconds until it flashes red, then purple and orange, and finally becomes solid white. Once you complete the factory reset, the printer will be set to its default settings.
Why does my Rollo printer keep disconnecting from WiFi?
It may disconnect due to several reasons, including signal interference, incorrect password, or router settings.
- Double-check that the WiFi network name and password you entered into the printer are accurate.
- Place the printer closer to the router to improve signal strength and stability.
- If available, use a WiFi extender to strengthen signal coverage.
- Make sure your router firmware is up to date.
How to update firmware on a Rollo printer via the app?
To update the firmware on a printer using the Rollo app, ensure that you are aware of the following points:
- Ensure your printer is up-to-date and connected to a WiFi network.
- The app will automatically check for and install firmware updates when a new version is available.
- The app may ask you to update the firmware when a new version is available.
- If the app does not automatically detect and install updates, go to the app’s settings or update section.
- After the update is complete, the app will notify you that the firmware update has been successful.
How to add a Rollo thermal printer to a Mac?
Learn how to add your Rollo thermal printer to your Mac, follow these steps:
- Connect one end of your USB cable to your thermal printer and the other to your Mac’s USB port.
- After that, go to the Apple menu and select System Preferences.
- Then, click on “Printers & Scanners”.
- Now, click the + button.
- Your printer’s name will appear in the list. Click on it, and your printer will be added automatically.
Can I switch Rollo printer’s WiFi network later?
Yes, you can switch it after the initial setup. Here’s how:
- You’ll need to access the printer’s settings, which can be done through a web interface or by using the Rollo app.
- Locate the WiFi settings and select Join WiFi network.
- Choose the new WiFi network you want to connect to.
- Enter the password for the new network.
- The printer will then ask you to connect to the new network.
- Once it’s connected, your printer’s WiFi LED will flash solid blue, indicating a successful connection.
Related Posts
© 2026 Invastor. All Rights Reserved
User Comments